

Anamorphic Bloom with Unreal Engine 4
How to modify UE4 source code to change the bloom shape.
How to modify UE4 source code to change the bloom shape.
May 21, 2017
The goal of this blog post is to describe how to modify the UE4 default bloom shape. This is possible with a specific console command but also by modifying the source of the engine.
This article is based on the Unreal Engine version 4.15/4.20. To make it work with newer versions take a look at the end of the article for additional information.
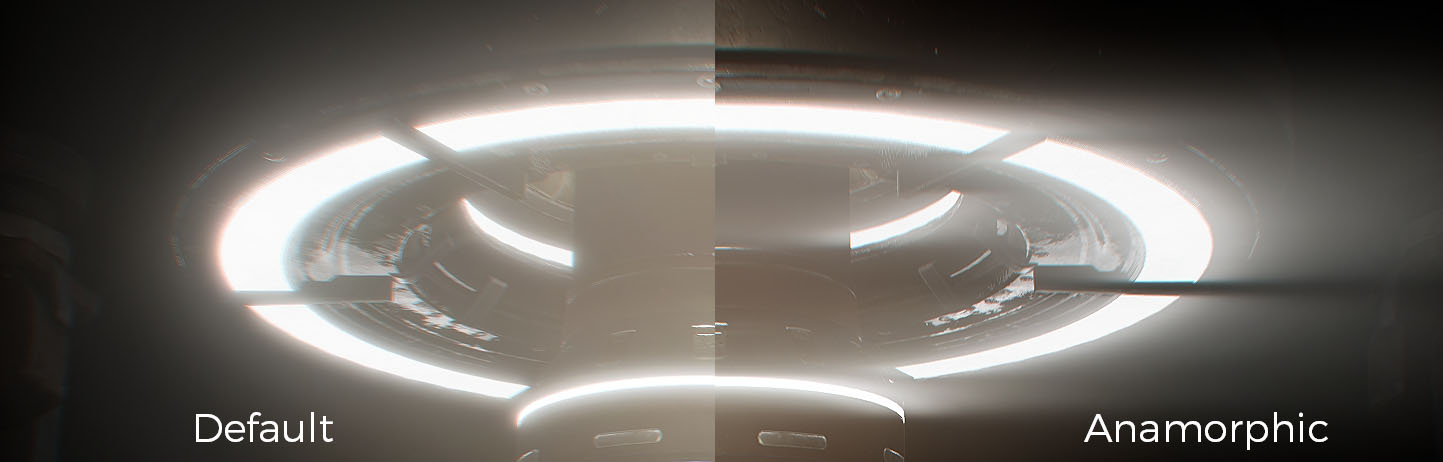
Usually a bloom effect is used to simulate an artifact from a camera. The part producing the artifact is the lens and not all of them behave the same way. The most common shape is a circle but some can bleed in other ways depending of the lens design. The goal here is to change from the common circle to either a cross or a simple horizontal line (like in the image above).
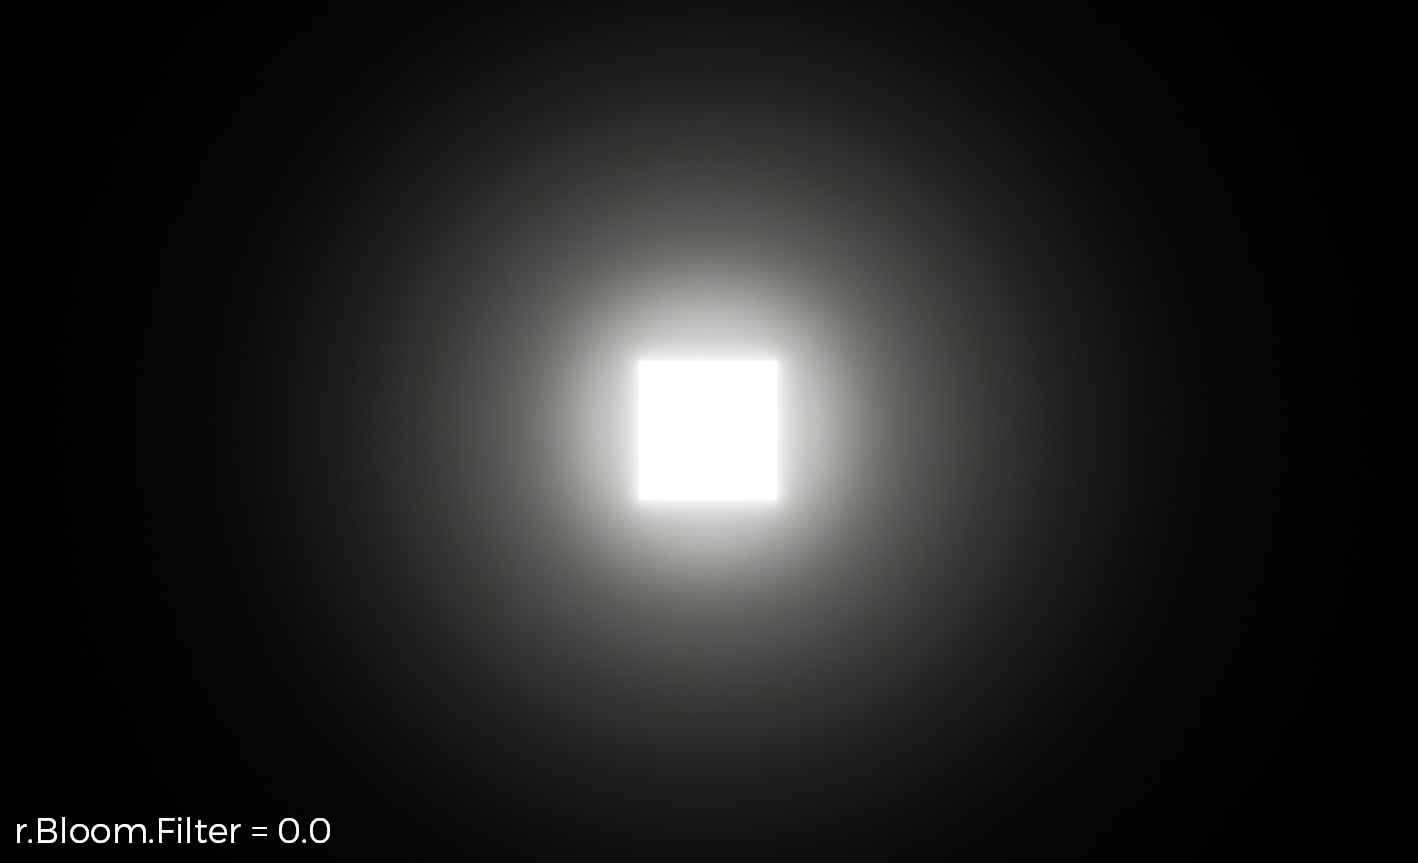
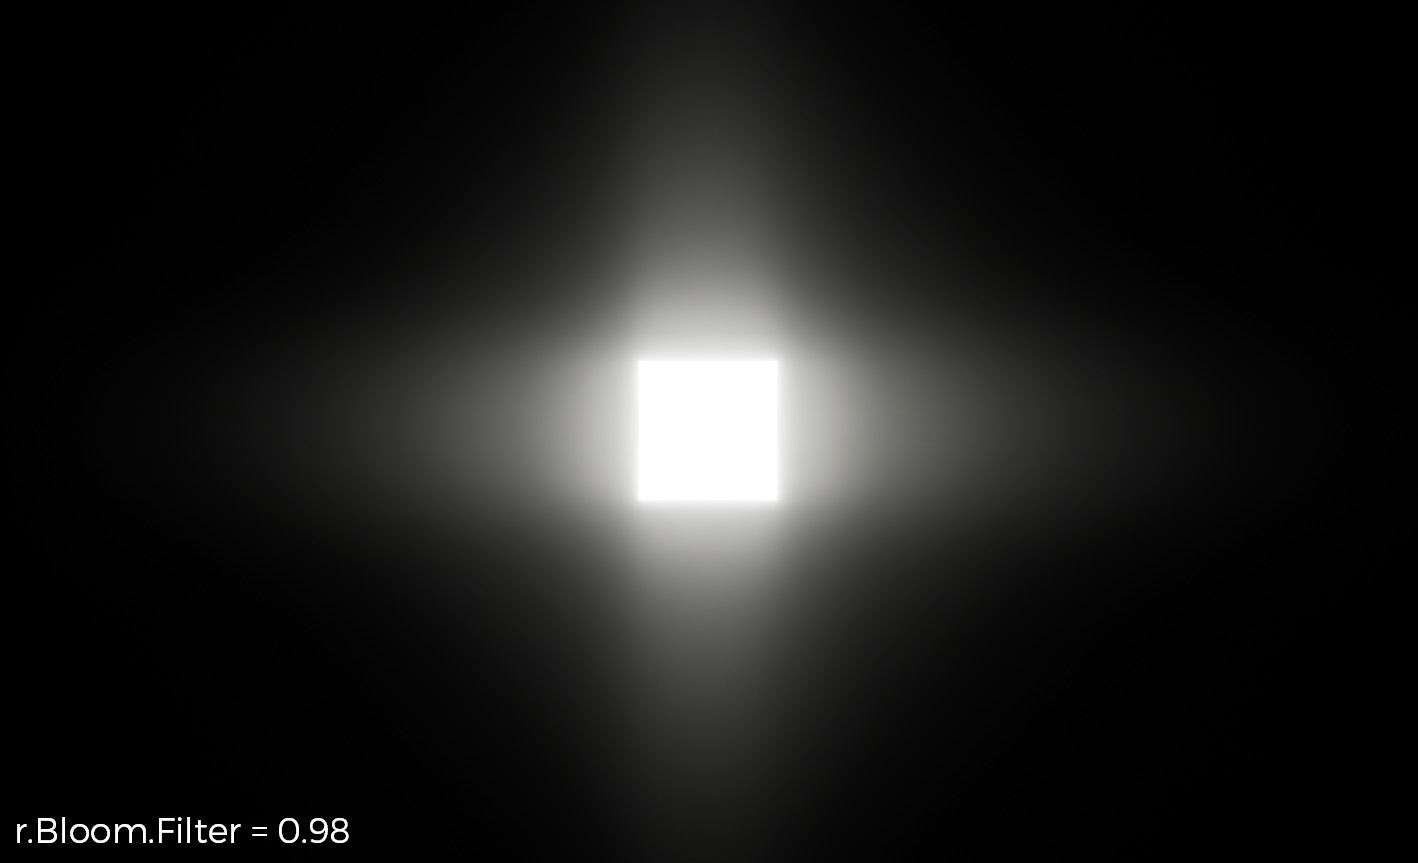
To my biggest surprise, it is already possible with the engine to modify the shape of the bloom. It is not exposed in the regular interface but it can be changed with a console command. I don’t know since when it is available, but I would say at least since a few versions.
The command is : r.Bloom.Cross. This command can take 3 types of values :
Here is the result of the command on a test scene (simple plane with an emissive shader in front of the camera) :

If you find the result good enough for you project, you can stop here. 🙂
(Notice that on the screenshots I use very specific values, it’s because I noticed the bloom behave incorrect with round values.)
The first results are nice but not good enough for what I want to achieve in my own projects. The first thing I wanted to do for example was to find a way to tweak the bloom shape in the editor without using the console command. For exemple I wanted to be able to switch the bloom effect depending if I wanted to simulate a camera, an eye or something else. Once I did that I also wanted to increase the intensity of the effect, to be able to have light bleeding to the edges of the screen with a shape in the middle.
To achieve this, I exposed two new parameters in the "advanced" section of the Bloom settings (in a post process volume) :
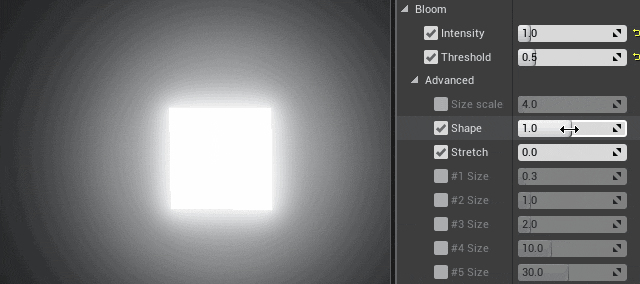
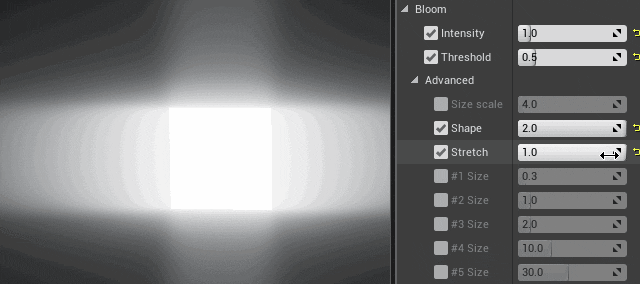
Note : to better see the bloom shape I changed the default colors (which go from white to grey). Theses colors have a direct impact on how strong and how quick the bloom fade when far from its source. If you are looking for a long bleed I recommend using a bright color for each bloom pass.
The first part is to create the additional controls for the interface. This means editing the engine files to add our own sliders. This can be done in two specific files :
First we have to add the override checkbox. This is done in Scene.h, find the line that have the "uint32 bOverride_BloomSizeScale:1;" and add your own, which in my case gives :
    UPROPERTY(EditAnywhere, BlueprintReadWrite, Category=Overrides, meta=(PinHiddenByDefault, InlineEditConditionToggle))
    uint32 bOverride_BloomSizeScale:1;

    UPROPERTY(EditAnywhere, BlueprintReadWrite, Category=Overrides, meta=(PinHiddenByDefault, InlineEditConditionToggle))
    uint32 bOverride_BloomShape:1;

    UPROPERTY(EditAnywhere, BlueprintReadWrite, Category=Overrides, meta=(PinHiddenByDefault, InlineEditConditionToggle))
    uint32 bOverride_BloomStretch:1;
I followed the original naming convention to add my Shape and Stretch parameters. I suggest doing the same as it will be easier to track later.
Next step is adding the actual parameters. Again, I looked in the same file for the size scale controls and added my own just after :
    /**
     * Scale for all bloom sizes
     */
    UPROPERTY(interp, BlueprintReadWrite, Category="Lens|Bloom", AdvancedDisplay, meta=(ClampMin = "0.0", UIMax = "64.0", editcondition = "bOverride_BloomSizeScale", DisplayName = "Size scale"))
    float BloomSizeScale;

    /**
     * Define bloom shape (horizontal, default or cross)
     */
    UPROPERTY(interp, BlueprintReadWrite, Category="Lens|Bloom", AdvancedDisplay, meta=(ClampMin = "0.0", UIMax = "2.0", editcondition = "bOverride_BloomShape", DisplayName = "Shape"))
    float BloomShape;

    /**
     * Define additional bloom scale (only useful for anamorphic/cross bloom)
     */
    UPROPERTY(interp, BlueprintReadWrite, Category="Lens|Bloom", AdvancedDisplay, meta=(ClampMin = "0.0", UIMax = "1.0", editcondition = "bOverride_BloomStretch", DisplayName = "Stretch"))
    float BloomStretch;
Now that we created the parameters, we have to give them default values. This is especially important to be able to blend post-process volumes and using the checkbox to enable/disable a parameters later. We still work in the same file but this time you can scroll near the end of it. Looks for the BloomIntensity or the BloomSizeScale and add the new parameters :
        // next value might get overwritten by r.DefaultFeature.Bloom
        BloomIntensity = 0.675f;
        BloomThreshold = -1.0f;
        // default is 4 to maintain old settings after fixing something that caused a factor of 4
        BloomSizeScale = 4.0;
    //-----------------------------------------
        BloomShape = 1.0f;
        BloomStretch = 0.0f;
    //-----------------------------------------
Now we switch over SceneView.cpp, in a similar way we look for the BloomSizeScale parameter and add our own. The goal here is to indicate to the engine we want these parameter to be blending when multiple post-process volumes overlap each other.
        LERP_PP(BloomSizeScale);
        LERP_PP(BloomShape);
        LERP_PP(BloomStretch);
Once done, I suggest starting the compilation of the engine. The reason is that Scene.h is a core element and is used by a lot of other classes. Changing this header file will trigger modifications in a lot of places. This means almost a full recompilation of the engine.
So while we do the other modifications, save some time and start compiling already ! 🙂
Now that we have the UI sliders ready, we can dive into the engine source code to change the bloom behavior.
This time we have to modify 3 files :
Let’s start with this header file. The changes here are minimal. We just need to add a variable that will be passed along by the main post-processing system to control the bloom shape. If you are curious, note that "CrossCenterWeight" is the actual parameter controlling the Bloom shape when you use the console command mentioned at the beginning.
We have to remove an assert check first, that would otherwise crash the engine if you try to use a negative value for the anamorphic bloom :
//
    void SetCrossCenterWeight(float InCrossCenterWeight) { check(InCrossCenterWeight >= 0.0f); CrossCenterWeight = InCrossCenterWeight; }
//
Becomes :
//
    void SetCrossCenterWeight(float InCrossCenterWeight) { CrossCenterWeight = InCrossCenterWeight; }
//
In a similar way we add our own variable and its Set() function :
    void SetStretch(float NewStretch) { Stretch = NewStretch; }
private:
    float Stretch;
Now we attack the body, which is the part with the most changes. We start by changing the constructor (since we added a new variable) :
FRCPassPostProcessWeightedSampleSum::FRCPassPostProcessWeightedSampleSum(EFilterShape InFilterShape, EFilterCombineMethod InCombineMethod, float InSizeScale, const TCHAR* InDebugName, FLinearColor InTintValue)
: FilterShape(InFilterShape)
, CombineMethod(InCombineMethod)
, SizeScale(InSizeScale)
, TintValue(InTintValue)
, DebugName(InDebugName)
, CrossCenterWeight(0.0f)
, Stretch(0.0f)
{
}
Then we need to modify the FRCPassPostProcessWeightedSampleSum::Process() function :
//
    float EffectiveBlurRadius = SizeScale * SrcSizeForThisAxis  / 2 / 100.0f;
//
Becomes :
    float ScreenScale = 100.0f;
    if( Stretch != 0.0f && FilterShape == EFS_Horiz )
    {
        ScreenScale = FMath::Lerp( 100.0f, 1.0f, Stretch );
    }

    float EffectiveBlurRadius = SizeScale * SrcSizeForThisAxis  / 2 / ScreenScale;
This part allows to change the strength of the bloom near bright sources via the stretch parameter. By default the ScreenScale is at 100%, meaning the blur radius is equivalent to the whole screen. Here with the stretch parameter we can make it down to 1%, making the effect much more wide and intense.
Then we also need to transfer the Stretch function over the gaussian computation of the bloom :
//
    uint32 NumSamples = Compute1DGaussianFilterKernel(FeatureLevel, EffectiveBlurRadius, OffsetAndWeight, MaxNumSamples, FilterShape, CrossCenterWeight);
//
Becomes :
//
    uint32 NumSamples = Compute1DGaussianFilterKernel(FeatureLevel, EffectiveBlurRadius, OffsetAndWeight, MaxNumSamples, FilterShape, CrossCenterWeight, Stretch);
//
Now we have to use this new parameter in the actual function, so go to Compute1DGaussianFilterKernel() in the same file :
//
    float Scale = 1.0f / ClampedKernelRadius;
//
Becomes :
    float Scale = 1.0f / ClampedKernelRadius;
    float WeightScale = 1.0f;

    if( Stretch != 0.0 )
    {
        float NewScale = 1.0f;

        if( CrossCenterWeight != 0.0f )
            NewScale = (FilterShape == EFS_Horiz) ? 0.5f : 10.0f;
        else
            NewScale = 0.5f;

        Scale = FMath::Lerp(Scale, Scale * NewScale, Stretch );
    }
This part allows to change the Bloom intensity on only a specific axis (since the bloom is performed with a box blur in two passes) if we match the right condition (horizontal bloom only). The ternary operation between 0.5 and 10.0 and to switch between a wide bloom a smaller one. The smaller the value is, the more wide the bloom will be. However I noticed that values below 0.5 can lead to some artifacts (the bloom steps start to be visible).
The last part requires to change a bit the content of the for() loop that follows :
        float TotalWeight = Weight0 + Weight1;
        OutOffsetAndWeight[NumSamples].X = (SampleIndex + Weight1 / TotalWeight);
        OutOffsetAndWeight[NumSamples].Y = TotalWeight;
        WeightSum += TotalWeight;
        NumSamples++;
Becomes :
        float TotalWeight = Weight0 + Weight1;

        if( FilterShape == EFS_Horiz && Stretch != 0.0 )
        {
            WeightScale = FMath::Lerp( 1.0f, FMath::Pow(1.05f, FMath::Abs(SampleIndex)), Stretch );
        }

        OutOffsetAndWeight[NumSamples].X = (SampleIndex + Weight1 / TotalWeight);
        OutOffsetAndWeight[NumSamples].Y = TotalWeight * WeightScale;
        WeightSum += TotalWeight;
        NumSamples++;
Here we change the total weight of the current bloom pass to make it more bright in general. The computation here is a trick to increase the bloom intensity but still make it fading naturally. Again, we use the Stretch value to control the intensity of this change.
Now that the Bloom system is ready to be used we need to do the last part : connecting the UI parameters to the bloom functions. This is done in PostProcessing.cpp ! In this file look for the declaration of the AddBloom() function and find the line that call the RenderBloom() function :
            if (Op.BloomSize > SMALL_NUMBER)
            {
                BloomOutput = RenderBloom(Context, PostProcessDownsamples[SourceIndex], Op.BloomSize * Settings.BloomSizeScale, Tint, BloomOutput);
            }
Becomes :
            if (Op.BloomSize > SMALL_NUMBER)
            {
                BloomOutput = RenderBloom(Context, PostProcessDownsamples[SourceIndex], Op.BloomSize * Settings.BloomSizeScale, Tint, BloomOutput, Settings.BloomShape, Settings.BloomStretch);
            }
Notice the Settings.BloomShape and Settings.BloomStretch, those values come from the Scene.h class, where post-process settings are defined. So basically we pass along the scene properties to the function.
Now we have to change the RenderBloom() function to use the new Shape and Stretch parameters :
// render one bloom pass and add another optional texture to it
static FRenderingCompositeOutputRef RenderBloom(
    FPostprocessContext& Context,
    const FRenderingCompositeOutputRef& PreviousBloom,
    float Size,
    FLinearColor Tint = FLinearColor::White,
    const FRenderingCompositeOutputRef Additive = FRenderingCompositeOutputRef(),
    float Shape = 0.0f,
    float Stretch = 0.0f)
{
    const float CrossBloom = CVarBloomCross.GetValueOnRenderThread();

    return RenderGaussianBlur(Context, TEXT("BloomBlurX"), TEXT("BloomBlurY"), PreviousBloom, Size, Tint, Additive, CrossBloom, Shape, Stretch);
}
As you can see it also calls the RenderGaussianBlur() function, so we need to pass along the new parameters and also edit this function. Note that I set default values for the new variables, this important if you want to keep the behavior of the DOF like before. The DOF and the Bloom use the same gaussian/downsample filters. Here is the final look of RenderGaussianBlur() :
// 2 pass Gaussian blur using uni-linear filtering
// @param CrossCenterWeight see r.Bloom.Cross (positive for X and Y, otherwise for X only)
static FRenderingCompositeOutputRef RenderGaussianBlur(
    FPostprocessContext& Context,
    const TCHAR* DebugNameX,
    const TCHAR* DebugNameY,
    const FRenderingCompositeOutputRef& Input,
    float SizeScale,
    FLinearColor Tint = FLinearColor::White,
    const FRenderingCompositeOutputRef Additive = FRenderingCompositeOutputRef(),
    float CrossCenterWeight = 0.0f,
    float Shape = 0.0f,
    float Stretch = 0.0f)
{
    //Bloom shape
    if( Shape != 1.0f )
    {
        Shape -= 1.0f;

        // If < 0 means horizontal bloom
        if( Shape != 0.0f )
            CrossCenterWeight = FMath::Lerp( 0.0f, -0.99f, FMath::Abs(Shape) );
        // Cross bloom
        else
            CrossCenterWeight = FMath::Lerp( 0.0f, 0.9f, Shape);
    }

    // Gaussian blur in x
    FRCPassPostProcessWeightedSampleSum* PostProcessBlurX = Context.Graph.RegisterPass(new(FMemStack::Get()) FRCPassPostProcessWeightedSampleSum(EFS_Horiz, EFCM_Weighted, SizeScale, DebugNameX));
    PostProcessBlurX->SetInput(ePId_Input0, Input);

    if(CrossCenterWeight != 0)
    {
        PostProcessBlurX->SetCrossCenterWeight(CrossCenterWeight);
        PostProcessBlurX->SetStretch(Stretch);
    }

    // Gaussian blur in y
    FRCPassPostProcessWeightedSampleSum* PostProcessBlurY = Context.Graph.RegisterPass(new(FMemStack::Get()) FRCPassPostProcessWeightedSampleSum(EFS_Vert, EFCM_Weighted, SizeScale, DebugNameY, Tint));
    PostProcessBlurY->SetInput(ePId_Input0, FRenderingCompositeOutputRef(PostProcessBlurX));
    PostProcessBlurY->SetInput(ePId_Input1, Additive);
    PostProcessBlurY->SetCrossCenterWeight(FMath::Abs(CrossCenterWeight));
    PostProcessBlurY->SetStretch(Stretch);

    return FRenderingCompositeOutputRef(PostProcessBlurY);
}
As you can see we find back the r.Bloom.Cross values from the original screenshots here. I use a Lerp() function to do a smooth transition between the default value and the new one based on the settings from the interface. I offset the Shape value because the interface is between 0 and 2, but I want a values between 0 and 1 (hence the use of the Abs() function).
This is also where we call our new SetStretch() function and connect the scene property to the rendering function.
We are done, you can compile and enjoy your new bloom ! 🙂
As you play with the settings you may notice some artifacts, especially if the Stretch value is set to 1.0. This is because we don’t change the number of passes done for the bloom but instead we change the offset and the weight. This is far from ideal, but is was much easier to change. The advantage of this method is also that it shouldn’t affect performances.
I’m not sure I understood at 100% the rendering pipeline of the bloom system. Some of my changes here are more similar to hacks. Maybe in the future I will be able to find a way to improve the final look.

Everything mentioned in the article should work fine up to UE4 4.20. After that, additional changes might be necessary. As of UE4 4.23, the following modifications should be taken into account.
The override boolean parameters are not uint32 anymore, they are instead uint8 now. Here is an example (make sure to replicate that to all the variables).
Before :
    UPROPERTY(EditAnywhere, BlueprintReadWrite, Category=Overrides, meta=(PinHiddenByDefault, InlineEditConditionToggle))
    uint32 bOverride_BloomShape:1;
After :
    UPROPERTY(EditAnywhere, BlueprintReadWrite, Category=Overrides, meta=(PinHiddenByDefault, InlineEditConditionToggle))
    uint8 bOverride_BloomShape:1;
The second change is a new constructor in Scene.h/Scene.cpp which pass the properties of a PostProcessSettings struct into a new one. If you did everything in the tutorial except this step, you will end-up with uninitialized variables and strange visual glitches.
The first step is to add our new variables to the struct. Open Engine\Source\Runtime\Engine\Classes\Engine\Scene.h and look for SizeScale to know where to add the Shape and Stretch :
    UPROPERTY(Interp, BlueprintReadWrite, Category="Lens|Bloom", AdvancedDisplay, meta=(ClampMin = "0.0", UIMax = "64.0", DisplayName = "Size scale"))
    float SizeScale;

    /**
     * Shape of the bloom (anamorphic to cross)
     */
    UPROPERTY(Interp, BlueprintReadWrite, Category="Lens|Bloom", AdvancedDisplay, meta=(ClampMin = "-1.0", UIMax = "1.0", DisplayName = "Shape"))
    float Shape;

    /**
     * Stretch of the bloom (to expand the shape)
     */
    UPROPERTY(Interp, BlueprintReadWrite, Category="Lens|Bloom", AdvancedDisplay, meta=(ClampMin = "0.0", UIMax = "1.0", DisplayName = "Stretch"))
    float Stretch;
The post-processing struct also has default values specified in the header file. To avoid uninitialized variable warnings we need to add the new Shape and Stretch variables. Look now for the FGaussianSumBloomSettings() line, then in the struct constructor function add the default variable values :
    FGaussianSumBloomSettings()
    {
        Intensity = 0.675f;
        Threshold = -1.0f;
        // default is 4 to maintain old settings after fixing something that caused a factor of 4
        SizeScale = 4.0;
        Shape = 0.0f;
        Stretch = 0.0f;
        Filter1Tint = FLinearColor(0.3465f, 0.3465f, 0.3465f);
        Filter1Size = 0.3f;
Head over the file Engine\Source\Runtime\Engine\Private\Scene.cpp now. Let’s start with the overrides booleans, so look for :
    , bOverride_BloomSizeScale(Settings.bOverride_BloomSizeScale)
    , bOverride_BloomConvolutionTexture(Settings.bOverride_BloomConvolutionTexture)
And replace it with :
    , bOverride_BloomSizeScale(Settings.bOverride_BloomSizeScale)
    , bOverride_BloomShape(Settings.bOverride_BloomShape)
    , bOverride_BloomStretch(Settings.bOverride_BloomStretch)
    , bOverride_BloomConvolutionTexture(Settings.bOverride_BloomConvolutionTexture)
Same with the actual variables, look for :
    , BloomSizeScale(Settings.BloomSizeScale)
    , Bloom1Size(Settings.Bloom1Size)
And replace it with :
    , BloomSizeScale(Settings.BloomSizeScale)
    , BloomShape(Settings.BloomShape)
    , BloomStretch(Settings.BloomStretch)
    , Bloom1Size(Settings.Bloom1Size)