Realtime Distance Field Textures in Unreal Engine 4
Generate distance field textures at runtime with the Jump Flood algorithm.
Generate distance field textures at runtime with the Jump Flood algorithm.
November 10, 2018
For a long time I wanted to be able to generate Distance Field textures on the fly to create various visual effects.
Lately I needed this effect to replicate the Photoshop "glow" filter that you can add on layers. The goal was to apply a "bloom" or "glow" on the UI I’m designing for my current project.
This article was written based on Unreal Engine 4.20
Quick recap for people who don’t know what distance fields are : a distance field is a grid that store in each cell the shortest distance to another cell with specific properties. In the case of a texture a cell is simply a pixel (or texel). It can be used to generate Voronoi patterns for example :


How does that help for shapes and text in UI ? Well, imagine a black and white texture where white is the text and black is the empty area around. The algorithm will mark the text itself as the important element to compute a distance against, giving the following result :


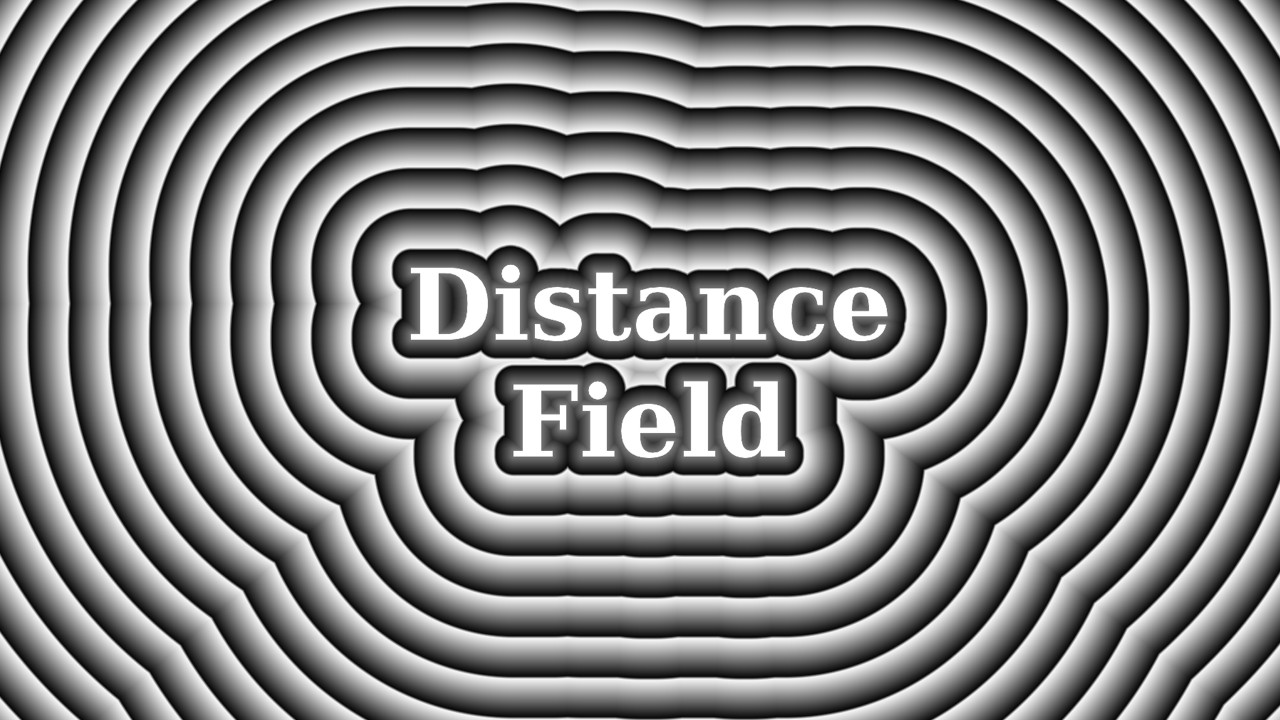
Now let’s make it easier to visualize, for example by dividing the distance in multiple steps :

This gives the same result as the "precise" mode in the Photoshop "glow" filter. If you need something softer, you can simply blur it afterward.
Once understood, the method is actually quite simple to operate. However the first time it may not seem that easy to grasp. I know I myself needed a few explanations before I was able to finally visualize it in my head.
The process relies on the Jump Flood method. This method works by repeating specific operations to reach the final result which has the advantage to have a fixed cost (so it is not affected by the content of the image to process) and it also well suited for running on GPUs.
The process works in two main steps : creating an initial mask then iterating on this mask with the Jump Flood algorithm.

Because for each pass we read the neighboar pixels value and write down a result, that means you can accumulate information that will end up with the smallest distance to a given point based on the original mask. The final distance result saved into the texture can then be intepreted to generated Voronoi patterns or other kind of effect.
To summary :
It is possible with regular shaders and Render Target Textures (or more precisely Canvas Render Target 2D) to replicate the algorithmic in Unreal Engine 4. The idea is to create a shader for each part of the process and render its result into a texture to store it. Then it’s just a matter of calling the right process at the right time. 🙂
We will need :
In the content browser of the Unreal Engine 4 editor, right-click to open the menu and choose "Materials & Textures" then "Canvas Render Target" :

Name the file as something like "RTT_A" (RenderTargetTexture_A) then double click to edit it’s properties in the Texture Editor. In the properties we wan’t to be sure to change the following settings :
The size can be changed later if needed, but for this tutorial we will stick to this resolution. The adress mode is set to clamp to avoid repeating the texture and computing incorrect distance values at the borders. The format is set to RG16f because we only need the Red and Green channel for the Jump Flood algorithm, however we need the floating 16 bits (to store big numbers), so be sure to choose the right value. Finally it is important to set the Texture Group to unfiltered, otherwise the bilinear sampling will creates unwanted side effects. The nearest sampling (implied by the unfiltered mode) will guarantee we only read one pixel at the time when performing the algorithm.

Next we will create the empty Materials, still in the Content Browser via the right-click menu :

Create three materials that I suggest naming to something like MAT_Distance_CreateMask for the first one, MAT_Distance_JumpFlood for the second one and finally for the third material (used for previewing the result) I suggest naming it as "MAT_Distance_Preview".
Before diving into the details of the materials, I suggest to create the blueprint actor that will handle the updates of the Render Targets. I’m using the begin play to setup the materials and then the tick to render everything else.
In the Begin Play I create three Dynamic Material Instances in order to be able to connect the Render Target textures and tweak the parameters :

Let’s continue with the Tick which is split in two parts :


The Jump Flood part relies on a loop which alternate between the two render targets (click on the image for a bigger view of the node network).

Here is the breakdown of this part :
That’s it !
The reason why the computation is done in the tick is just in case you need to regenerate the mask (in case the source texture is dynamic and its content changes). If you only need to generate once the Distance Field, then there is no need to update it again and it could become a one-time function (in the Begin play for example).
I will not spent too much time on this part as we will modify it later. The idea here is to translate the output of the algorithm into a more readable information. So let’s edit the material "MAT_Distance_Preview" :

Basically what this material does is compute a distance from the original UV coordinates (TexCoord node) and the UV coordinates saved inside the final Render Target. Then we do a few math operations to visualize that distance. The result will be similar to this :
Now let’s focus on how the Jump Flood actually works. The material "MAT_Distance_CreateMask" is used to compute the information about our source image that we will then feed to the Jump Flood algorithm. The idea is to create something similar to a mask : we want to separate valid and invalid values. Invalid values are areas where we want to put a distance value into, while valid values are our original shapes that we want to preserve.
Because of the nature of how Distance Fields work, the border of the source mask can only be 0 or 1. This means if you have an anti-aliased shape as your source, you will end up with aliasing in the mask. However this is usually not an issue since we can use the distance field to refine the shape later. This is why Distance Fields are used for low resolution fonts !
Since this material is only used to render things into textures, there is no need to use all the regular material features, therefor we can optimize it a bit by switching the "Material Domain" setting to "User Interface". This will generate a material with less instruction that the regular "Surface".

Now let’s create the node network :

As you can see the graph is divided in two big parts :
After the mask has been created we have to implement the actual algorithm. This is done in the material "MAT_Distance_JumpFlood ". As explained a bit before we read the pixels to compute a distance and store the result into the texture. We repeat the process multiple times by a number of steps defined by the texture size. In Unreal this translate by the usage of two render targets : we need one to read and one to write (then we switch roles).
As for the Mask material, let’s make sure our Jump Flood material is set to the "User Interface" material domain to make it cheaper to run. Now let’s edit it with the following graph :

The graph is divided into the following parts :
Now let’s focus on the Custom node since this is where the actual work happens. First be sure to setup it as the following :

The output type needs to be a Float 2 since we are rendering into Render Targets that only have a Red and Green channel (RG16f). For the rest, it’s just the paramerters that we will feed to the code of the node. As for the code itself, here is what it looks like :
float BestDistance  = 9999.0;
float2 BestCoord    = float2(1.0, 1.0);

for( int y = -1; y <= 1; ++y )
{
    for( int x = -1; x <= 1; ++x )
    {
        float2 SampleCoord = UV + float2(x,y) * Step;
        float2 SeedCoord = Tex.SampleLevel(TexSampler, SampleCoord, 0).rg;
        float Dist = length(SeedCoord - UV);

        if( Dist < BestDistance )
        {
            BestDistance = Dist;
            BestCoord = SeedCoord;
        }
    }
}

return BestCoord;
It’s rather simple, let’s dive into the details :
This might be confusing : why outputing the UV coordinates instead of the Distance ? Mostly for two reasons. First is that for each iterations we read the pixel value which contains the nearest pixel coordinates so we need this positon for doing our comparisons. Secondly this information will be more usefull later depending of the effect we want to achieve.
That’s why in the Mask material we wanted to write down a very high value so that it could be noted as "invalid" and therefor overwritten by a more closer value.
Also how many iterations are necessary to get the right result ? This can be determined simply by following the texture resolution. Since we take the half distance at each iteration, it means the last iteration should be the next pixel to the current one. For a 512×512 pixels texture we can compute it with log2(512) which gives us 9 iterations :
The progressive iterations should result to something like this (here slowed down for viewing purpose) :

Since the Jump Flood computed the nearest pixels and stored the UV coordinates as a result we end-up with an UV advection texture. That means we we can use that texture as our new UV coordinates to sample our original image and create a dilation of the original pixels :

Here txt_input is the Jump Flood result texture and txt_base is the original image.
So here is what we get, going from left to right : the original image, the Jump Flood result, the UV advection result (dilation) and the combination (with the distance as a mask on top).


Note : the colors may not seem uniform only because the way I extracted the mask is not perfect and result in sampling pixels that blend to black giving me non-uniform colors.
The first two links cover the Jump Flood algorithm, while the two other are just additional information (especially towards good blur and bloom effects for realtime rendering) :