
Creating Seamless Portals in Unreal Engine 4
"Now you are thinking with portals", or how to build a portal system.
"Now you are thinking with portals", or how to build a portal system.
March 28, 2019
In this article I cover how to create Portals in Unreal Engine 4. As I did not find any write-up that would provide enough details to explain how to create such system (viewing but also crossing the portals) I decided to write my own.
This article was written based on Unreal Engine 4.25.
Let’s start with examples and an explanation of what is a Portal. A quick way to define Portals is to see them as a way to walk from one space to one another. Some very popular games used that concept for visuals and even gameplay mechanics :
(Portal, 2007)
(Antichamber, 2013)

(Prey, 2006)
Portal is likely the most well known of the three, however in my case it is Prey which always fascinated me and that I always wanted to copy. At some point I tried implementing my own version in Unreal Engine 4 but did not managed to go far since the engine was missing some functionalities. I was still able to get experiments that looked like this :
However with the current versions of Unreal Engine I was finally able to manage the right effect :
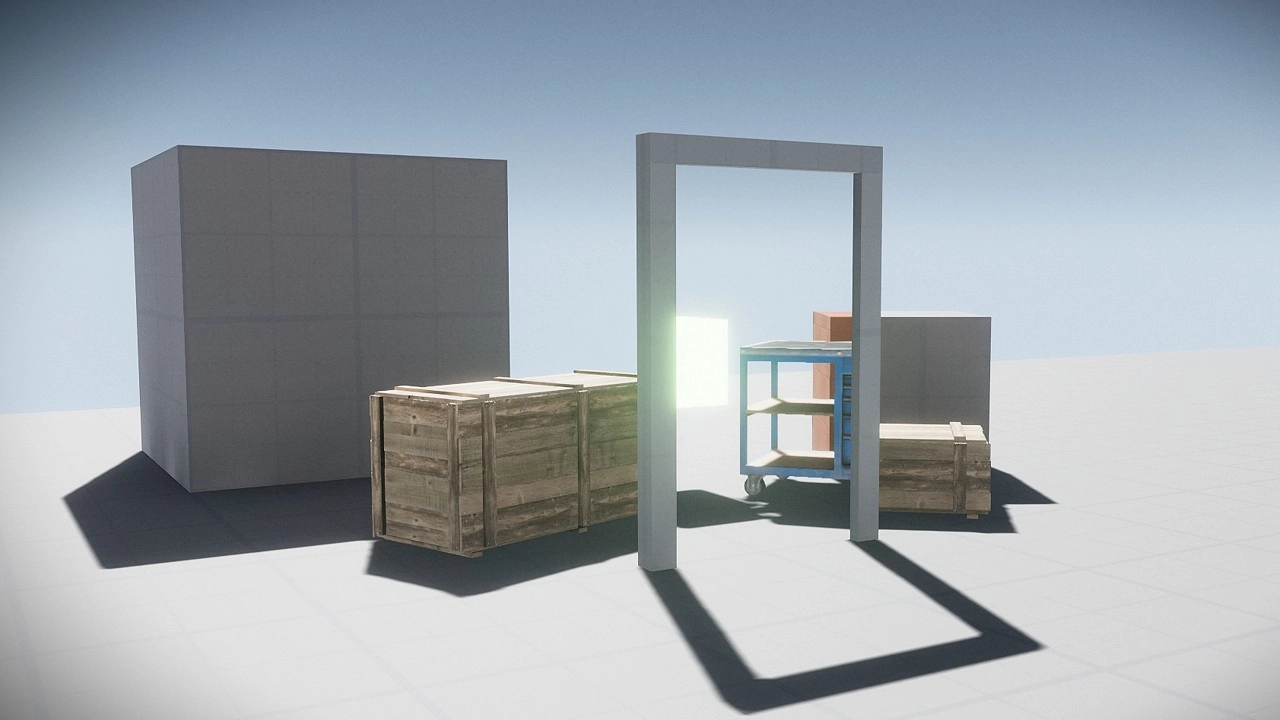
Before diving into specifics let’s see how a portal works in the big picture.
A portal is basically looking into a window that does not look outside but into another place, that means we define a specific point of view locally to an object and replicate that point of view somewhere else. By this principle we can stick two spaces next to each other even if they are far away. The window is like a mask that allows us to know where and when to display the other space instead of the original one. Since the original point of view is replicated to the other place it gives the illusion of being continuous.
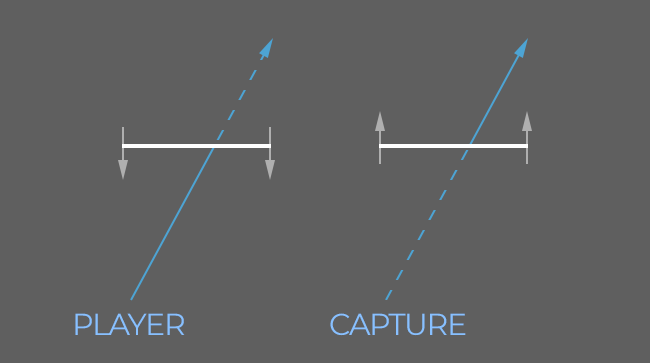
In the graphic above, the Capture device (a SceneCapture in UE4) is located in front of a space that match one visible from the player point of view. Everything visible after the line is replaced by what the capture can see. Because the capture device could be located between a door and other objects, it is important to put in place what we call a "clipping plane". In case of a portal what we want is a near clipping plane which will mask out objects visible before the portal.
To summarize what we need :
How does that translate into the Unreal Engine then ?
I build my system around two main classes which are managed by the PlayerController and the Character. The "Portal" class is an actual Portal entry point in a level with a target actor as its viewing/exit point. Then there is the "Portal Manager" which is spawned by the PlayerController and updated by the Character in order to manage/update properly every portal in the level as well as manipulating the SceneCapture object (which is shared between Portals).
Please note that the rest of the tutorial expect you to have a access from the code to a Character and PlayerController class. In my case they are called "ExedreCharacter" and "ExedrePlayerController".
Like mentioned in the previous section, we need a clipping plane to ignore anything that would appear between the camera and the portal target. To do so, an engine setting must be enabled which allows us to override the default clipping plane value.
Launch the editor with your project, then heads-up toward the Edit menu and open the Project Settings. Then go into the Rendering settings under the Engine section and look for the setting named Support global clip plane for Planar Reflections and enable it.

Save your settings then close the editor.
Let’s start by creating a Portal actor, which will be used to define a "window" to look through in the levels. The goal of the actor will be to provide information relative to the player to compute different positions and rotations. It will also handle detecting when the player is crossing or not the portal and teleport him.
Before diving into the details of the actor, let’s explain a few concepts I elaborated to manage my portal system :
From these rules I created a new class inheriting AActor as my starting point and named it "ExedrePortal". Here is the header :
#pragma once

#include "CoreMinimal.h"
#include "GameFramework/Actor.h"
#include "ExedrePortal.generated.h"

UCLASS()
class EXEDRE_API AExedrePortal : public AActor
{
    GENERATED_UCLASS_BODY()

    protected:
        virtual void BeginPlay() override;

    public:
        virtual void Tick(float DeltaTime) override;

        //Status of the Portal (being visualized by the player or not)
        UFUNCTION(BlueprintPure, Category="Exedre|Portal")
        bool IsActive();

        UFUNCTION(BlueprintCallable, Category="Exedre|Portal")
        void SetActive( bool NewActive );

        //Render target to use to display the portal
        UFUNCTION(BlueprintNativeEvent, BlueprintCallable, Category="Exedre|Portal")
        void ClearRTT();

        UFUNCTION(BlueprintNativeEvent, BlueprintCallable, Category="Exedre|Portal")
        void SetRTT( UTexture* RenderTexture );

        UFUNCTION(BlueprintNativeEvent, Category="Exedre|Portal")
        void ForceTick();

        //Target of where the portal is looking
        UFUNCTION(BlueprintPure, Category="Exedre|Portal")
        AActor* GetTarget();

        UFUNCTION(BlueprintCallable, Category="Exedre|Portal")
        void SetTarget( AActor* NewTarget );

        //Helpers
        UFUNCTION(BlueprintCallable, Category="Exedre|Portal")
        bool IsPointInFrontOfPortal( FVector Point, FVector PortalLocation, FVector PortalNormal );

        UFUNCTION(BlueprintCallable, Category="Exedre|Portal")
        bool IsPointCrossingPortal( FVector Point, FVector PortalLocation, FVector PortalNormal );

        UFUNCTION(BlueprintCallable, Category="Exedre|Portal")
        void TeleportActor( AActor* ActorToTeleport );

    protected:
        UPROPERTY(BlueprintReadOnly)
        USceneComponent* PortalRootComponent;

    private:
        bool bIsActive;

        AActor* Target;

        //Used for Tracking movement of a point
        FVector LastPosition;
        bool    LastInFront;
};
As you can see, most of the behaviors I described in the first place are present here. Now let’s see how they are handled in the body (.cpp).
The constructor here focus on the setup of root components. The reason why I choose to create two root components is that the portal actor will combine visuals and collisions/detections. So I wanted an easy way to know where the window/portal plane is without having to rely on Blueprint functions or any other tricks. The PortalRootComponent here will be the basis of all the Portal related computation later.
The Portal root si set as dynamic in case the Blueprint class animates it (like using an opening/closing sequence).
// Sets default values
AExedrePortal::AExedrePortal(const FObjectInitializer& ObjectInitializer)
    : Super(ObjectInitializer)
{
    PrimaryActorTick.bCanEverTick   = true;
    bIsActive                       = false;

    RootComponent = CreateDefaultSubobject<USceneComponent>(TEXT("RootComponent"));
    RootComponent->Mobility = EComponentMobility::Static;

    PortalRootComponent = CreateDefaultSubobject<USceneComponent>(TEXT("PortalRootComponent"));
    PortalRootComponent->SetupAttachment( GetRootComponent() );
    PortalRootComponent->SetRelativeLocation( FVector(0.0f, 0.0f, 0.0f) );
    PortalRootComponent->SetRelativeRotation( FRotator(0.0f, 0.0f, 0.0f) );
    PortalRootComponent->Mobility = EComponentMobility::Movable;
}
Get and Set functions, nothing more. The active status will be managed elsewhere.
bool AExedrePortal::IsActive()
{
    return bIsActive;
}

void AExedrePortal::SetActive( bool NewActive )
{
    bIsActive = NewActive;
}
The blueprint events, I do nothing in the C++ class.
void AExedrePortal::ClearRTT_Implementation()
{

}

void AExedrePortal::SetRTT_Implementation( UTexture* RenderTexture )
{

}

void AExedrePortal::ForceTick_Implementation()
{

}
The Get and Set functions for the Target actor. Again nothing more complicated for that part.
AActor* AExedrePortal::GetTarget()
{
    return Target;
}

void AExedrePortal::SetTarget( AActor* NewTarget )
{
    Target = NewTarget;
}
With this function we can easily check if a point is in front of a plane, and in our case it’s the portal. The function takes advantage of the FPlane struct from UE4 to perform the computation.
bool AExedrePortal::IsPointInFrontOfPortal( FVector Point, FVector PortalLocation, FVector PortalNormal )
{
    FPlane PortalPlane  = FPlane( PortalLocation, PortalNormal );
    float PortalDot     = PortalPlane.PlaneDot( Point );

    //If < 0 means we are behind the Plane
    //See : http://api.unrealengine.com/INT/API/Runtime/Core/Math/FPlane/PlaneDot/index.html
    return ( PortalDot >= 0 );
}
This function checks if a point crossed the portal plane. This is were we use the old position in order to know how the point is behaving. This function is generic so that it could work with any Actor, but in my use-case it is only for the player.
The function works by creating a direction/segment from the previous location and the current one and see if it intersects the plane. If it does, we check if with the previous information (is it in front ?) we are crossing in the right direction.
bool AExedrePortal::IsPointCrossingPortal( FVector Point, FVector PortalLocation, FVector PortalNormal )
{
    FVector IntersectionPoint;
    FPlane PortalPlane  = FPlane( PortalLocation, PortalNormal );
    float PortalDot     = PortalPlane.PlaneDot( Point );
    bool IsCrossing     = false;
    bool IsInFront      = PortalDot >= 0;

    bool IsIntersect    = FMath::SegmentPlaneIntersection(  LastPosition,
                                                            Point,
                                                            PortalPlane,
                                                            IntersectionPoint );

    // Did we intersect the portal since last Location ?
    // If yes, check the direction : crossing forward means we were in front and now at the back
    // If we crossed backward, ignore it (similar to Prey 2006)
    if( IsIntersect && !IsInFront && LastInFront )
    {
        IsCrossing  = true;
    }

    // Store values for next check
    LastInFront     = IsInFront;
    LastPosition    = Point;

    return IsCrossing;
}
The last part of the Portal actor that we need to look into is of course the TeleportActor() function.
When teleporting an actor from point A to point B you have to replicate its movement and position. If for example it is the Player that is crossing, combined with the right visuals it will just feel like traversing a simple doorway.
Crossing a Portal feels like following a straight line but in reality this is not really what happens. When exiting the Portal you can be in a very different context. Take an example from Portal :
As you can see here when crossing the Portal, the camera is rotating on it’s forward vector (Roll). This is because the start point and the end point are not aligned on the same plane :
Therefor to make things work it is necessary to convert the Player’s movement into the relative space of the Portal to translate it into the one of its target. By doing so we can be sure that when we enter the Portal and exit on the other side we remain properly aligned. This apply to the both the location and rotation of the Actor but as well to its velocity.
If you teleport your actor as-is with the local rotation being transformed, you may end-up with an actor looking upside-down. This may be fine for props but likely not for characters such as the player. You will have to re-orient the Actor as seen in the Portal gif above.
void AExedrePortal::TeleportActor( AActor* ActorToTeleport )
{
    if( ActorToTeleport == nullptr || Target == nullptr )
    {
        return;
    }

    //-------------------------------
    //Retrieve and save Player Velocity
    //(from the Movement Component)
    //-------------------------------
    FVector SavedVelocity   = FVector::ZeroVector;
    AExedreCharacter* EC    = nullptr;

    if( ActorToTeleport->IsA( AExedreCharacter::StaticClass() ) )
    {
        EC = Cast<AExedreCharacter>( ActorToTeleport );

        SavedVelocity = EC->GetCharMovementComponent()->GetCurrentVelocity();
    }

    //-------------------------------
    //Compute and apply new location
    //-------------------------------
    FHitResult HitResult;
    FVector NewLocation = UTool::ConvertLocationToActorSpace(   ActorToTeleport->GetActorLocation(),
                                                                this,
                                                                Target );

    ActorToTeleport->SetActorLocation(  NewLocation,
                                        false,
                                        &HitResult,
                                        ETeleportType::TeleportPhysics );

    //-------------------------------
    //Compute and apply new rotation
    //-------------------------------
    FRotator NewRotation = UTool::ConvertRotationToActorSpace(  ActorToTeleport->GetActorRotation(),
                                                                this,
                                                                Target );

    //Apply new rotation
    ActorToTeleport->SetActorRotation( NewRotation );

    //-------------------------------
    //If we are teleporting a character we need to
    //update its controller as well and reapply its velocity
    //-------------------------------
    if( ActorToTeleport->IsA( AExedreCharacter::StaticClass() ) )
    {
        //Update Controller
        AExedrePlayerController* EPC = EC->GetPlayerController();

        if( EPC != nullptr )
        {
            NewRotation = UTool::ConvertRotationToActorSpace(   EPC->GetControlRotation(),
                                                                this,
                                                                Target );

            EPC->SetControlRotation( NewRotation );
        }

        //Reapply Velocity (Need to reorient direction into local space of Portal)
        {
            FVector Dots;
            Dots.X  = FVector::DotProduct( SavedVelocity, GetActorForwardVector() );
            Dots.Y  = FVector::DotProduct( SavedVelocity, GetActorRightVector() );
            Dots.Z  = FVector::DotProduct( SavedVelocity, GetActorUpVector() );

            FVector NewVelocity     = Dots.X * Target->GetActorForwardVector()
                                    + Dots.Y * Target->GetActorRightVector()
                                    + Dots.Z * Target->GetActorUpVector();

            EC->GetCharMovementComponent()->Velocity = NewVelocity;
        }
    }

    //Cleanup Teleport
    LastPosition = NewLocation;
}
As you probably noticed, I call some external functions to handle the rotation/location conversion. They are from a custom class named "UTool" that defines static functions that can be called from anywhere (including Blueprints). Below are their definition, feel free to implement them where they fit the best for you (the easiest is probably to put them in the Portal Actor class).
FVector ConvertLocationToActorSpace( FVector Location, AActor* Reference, AActor* Target )
{
    if( Reference == nullptr || Target == nullptr )
    {
        return FVector::ZeroVector;
    }

    FVector Direction       = Location - Reference->GetActorLocation();
    FVector TargetLocation  = Target->GetActorLocation();

    FVector Dots;
    Dots.X  = FVector::DotProduct( Direction, Reference->GetActorForwardVector() );
    Dots.Y  = FVector::DotProduct( Direction, Reference->GetActorRightVector() );
    Dots.Z  = FVector::DotProduct( Direction, Reference->GetActorUpVector() );

    FVector NewDirection    = Dots.X * Target->GetActorForwardVector()
                            + Dots.Y * Target->GetActorRightVector()
                            + Dots.Z * Target->GetActorUpVector();

    return TargetLocation + NewDirection;
}
The conversion here works by computing the dot product between vectors to determine multiple angles. The "Direction" vector is not normalized which means we can just re-multiply the Dot result against the vectors of the Target to retrieve the Location at exactly the same distance in the local space of the Target actor.
FRotator ConvertRotationToActorSpace( FRotator Rotation, AActor* Reference, AActor* Target )
{
    if( Reference == nullptr || Target == nullptr )
    {
        return FRotator::ZeroRotator;
    }

    FTransform SourceTransform  = Reference->GetActorTransform();
    FTransform TargetTransform  = Target->GetActorTransform();
    FQuat QuatRotation          = FQuat( Rotation );

    FQuat LocalQuat             = SourceTransform.GetRotation().Inverse() * QuatRotation;
    FQuat NewWorldQuat          = TargetTransform.GetRotation() * LocalQuat;

    return NewWorldQuat.Rotator();
}
For converting the rotation this was a bit more complicated. Using Quaternions was the best solution in the end because it is much more precise that dealing with the regular Euler angles while requiring only a few lines of code. Quaternion rotations work by multiplications, so in this case using the Inverse() against the Rotation we want to convert will translate it into a local space. From there we just need to multiply it against the rotation of the Target to get the final rotation.
My portal system relies on a specific mesh to look good from the Player’s point of view. The mesh is divided into two different planes :
So, why using a mesh like this ?
I designed Plane 1 to be stretched when the player gets close to it. This allows to overlap and walk on the portal without clipping (cutting) it. This can happen if for example the camera did not cross the portal plane yet but the player’s legs did. It avoids managing to clip the player and duplicating its mesh on the other side.
For Plane 2 The goal is to expand the default bounding box of the mesh. Because Plane 1 being a plane, the bounding box on one axis is 0 and if the camera end-up behind, it would be culled by the engine (aka not rendering it anymore). Plane 1 has a size of 128×128 so that it can be easily scaled in-engine. Plane 2 is slightly bigger and below the floor (below 0).
Once the mesh is ready, simply export it from your 3D software and import it into Unreal. We will use is in the next step.
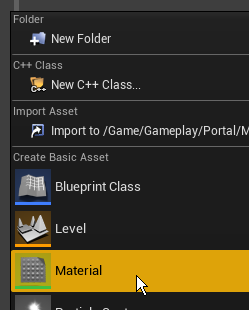
In order to display the other side of the portal we will need a custom material. Create a new material in the content browser (I named it "MAT_PortalBase") :
Now let’s open it and create the following graph :
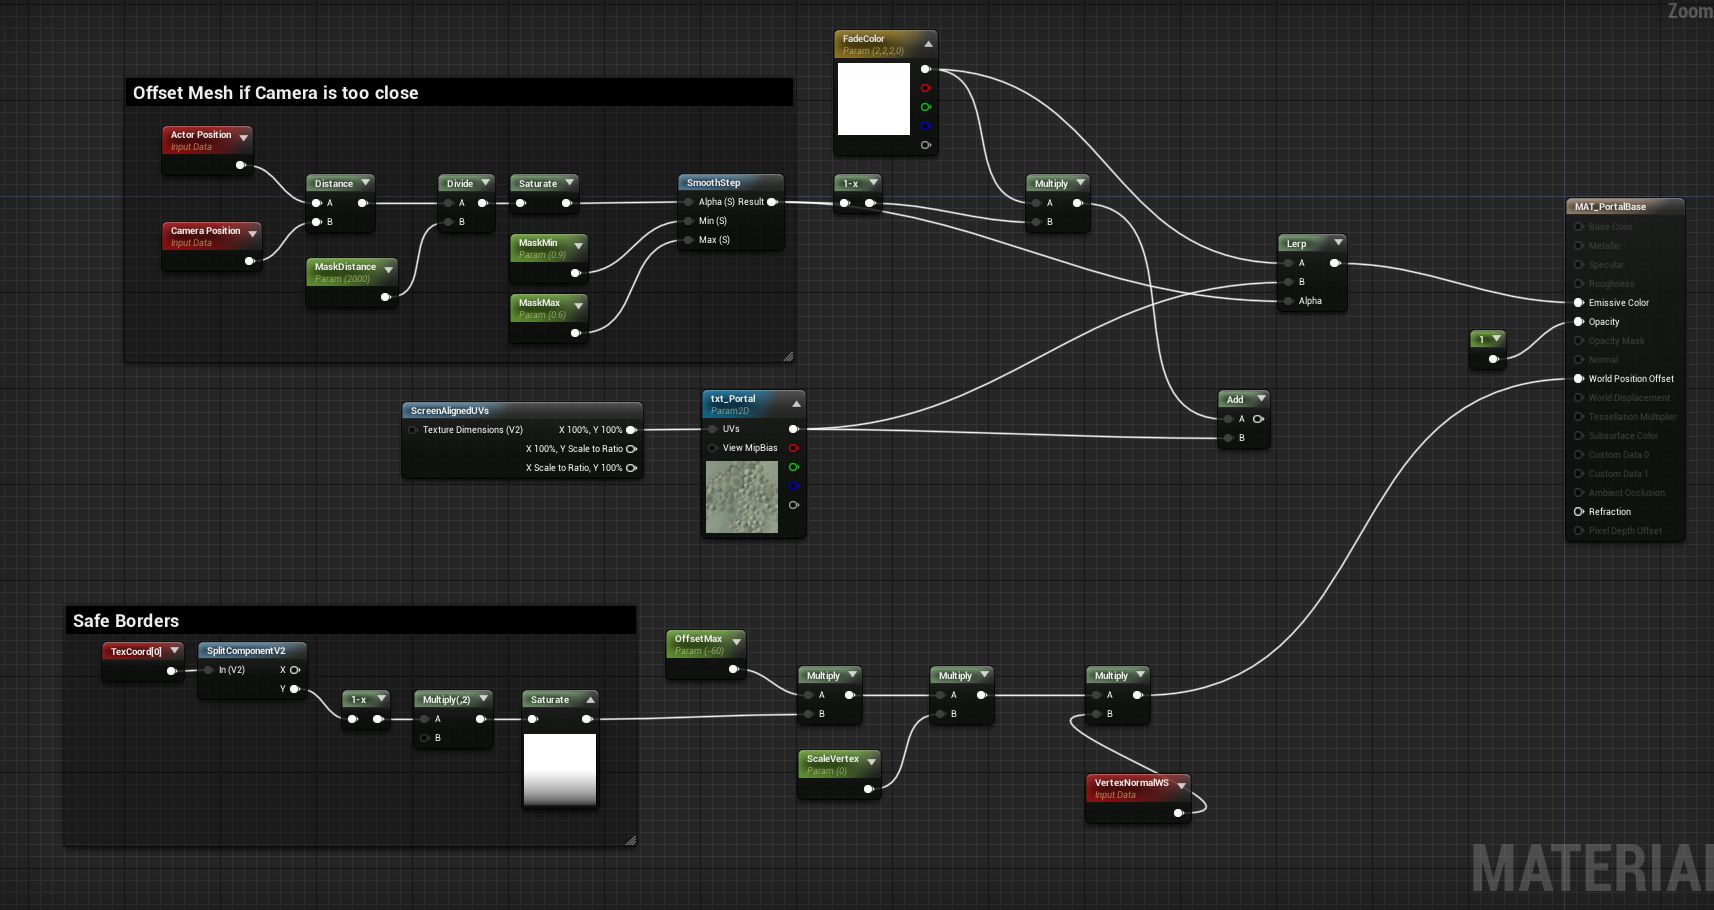
Here is how the material works :
With all of that the material is ready to be used.
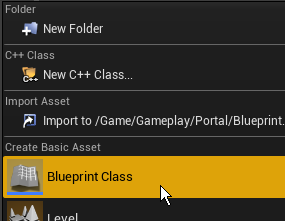
Let’s setup a new blueprint class which inherit from the Portal actor. Right-click in your content browser and choose Blueprint class :
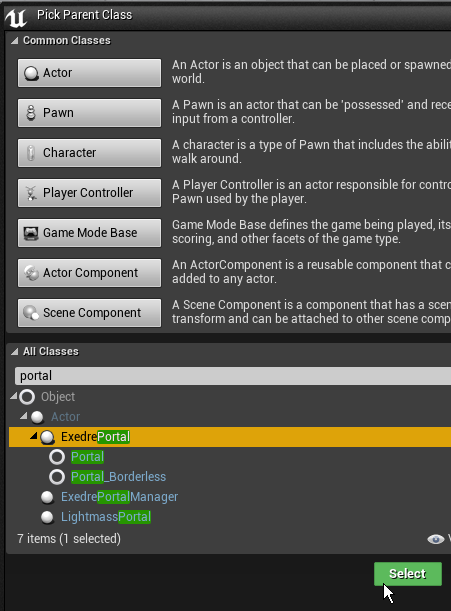
Now type "portal" in the search field to isolate the portal class and select it :
Open up the blueprint if it’s not already done. You will see the following hierarchy in the component list :
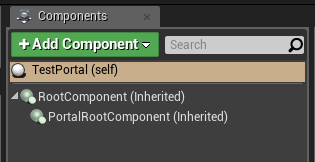
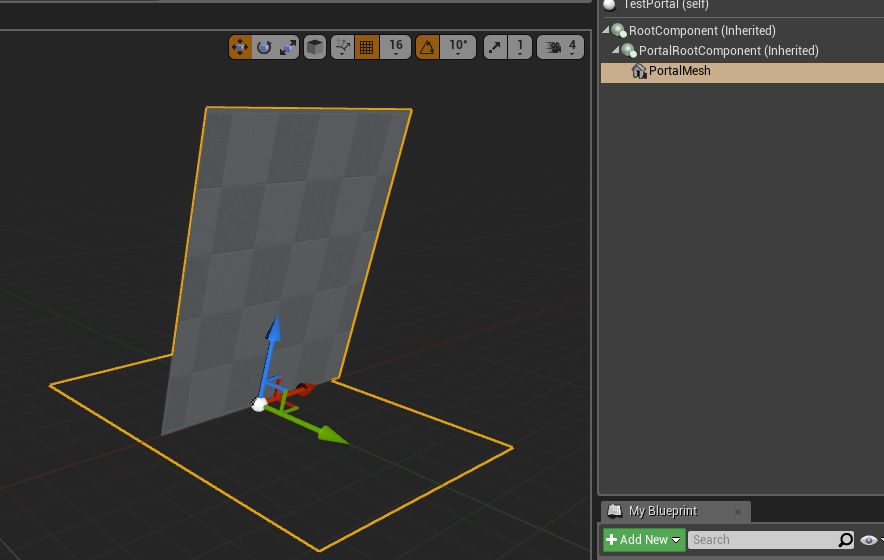
As you can see, the root component and portal root are present as expected. Let’s add a static mesh component under the "PortalRootComponent" and load the mesh we created in the previous step into it :
Add as well a Collision Box which will be used to know if the Player is inside the volume of the Portal or not :
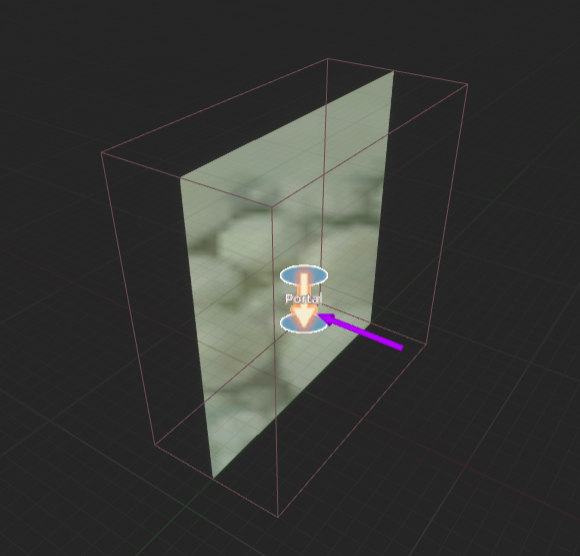
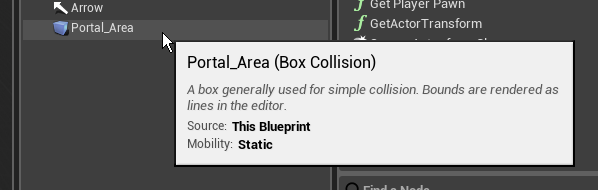
The collision box is below a scene component linked to the main root, it is not under the Portal root. I also added an icon (billboard) and an arrow component to make the Portal easier to read in my levels, but that’s not mandatory of course.
Now let’s setup the material in the Blueprint.
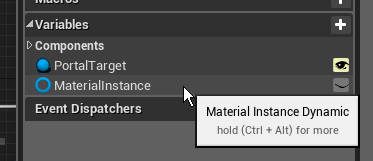
First we need two variables, one being of the type "Actor" named "PortalTarget" and the other being of the type "Dynamic Material Instance" named "MaterialInstance". The Portal Target will be a reference to where the Portal window will look at (hence why it is public, the visible eye) that we can edit it when the actor will be placed in the level. The Material Instance will store a reference to the dynamic material so that later we can assign the Portal render target on the fly.
We will need to add our custom event nodes as well. The best for that is to open the right click menu in the Event Graph and search for our custom event names :
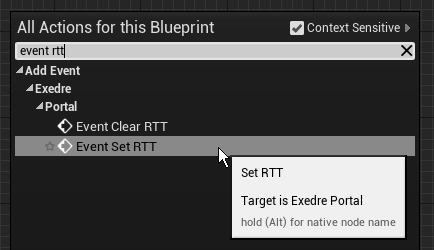
From there create the following setup :
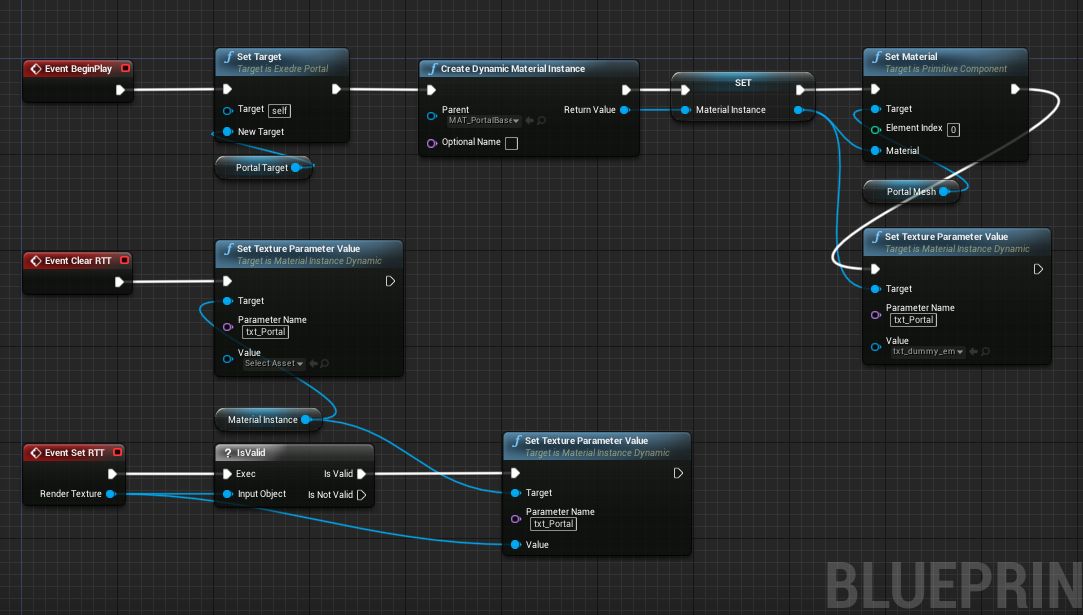
We are done for now with this Blueprint but we will come back later to implement the Tick function(s).
Alright, now that we have the basic elements we need to create a new class inherited from AActor which will be our Portal Manager. The Portal Manager class may not be needed depending of your own project but in my case it made some things much more convenient to handle. Here is a list of what the Portal manager do :
Let’s take a look at the header of the Portal Manager :
#pragma once

#include "CoreMinimal.h"
#include "GameFramework/Actor.h"
#include "ExedrePortalManager.generated.h"

//Forward declaration
class AExedrePlayerController;
class AExedrePortal;
class UTextureRenderTarget2D;

UCLASS()
class EXEDRE_API AExedrePortalManager : public AActor
{
    GENERATED_UCLASS_BODY()

    public:
        AExedrePortalManager();

        // Called by a Portal actor when wanting to teleport something
        UFUNCTION(BlueprintCallable, Category="Portal")
        void RequestTeleportByPortal( AExedrePortal* Portal, AActor* TargetToTeleport );

        // Save a reference to the PlayerControler
        void SetControllerOwner( AExedrePlayerController* NewOwner );

        // Various setup that happens during spawn
        void Init();

        // Manual Tick
        void Update( float DeltaTime );

        // Find all the portals in world and update them
        // returns the most valid/usable one for the Player
        AExedrePortal* UpdatePortalsInWorld();

        // Update SceneCapture
        void UpdateCapture( AExedrePortal* Portal );

    private:
        //Function to create the Portal render target
        void GeneratePortalTexture();

        UPROPERTY()
        USceneCaptureComponent2D* SceneCapture;

        UPROPERTY(transient)
        UTextureRenderTarget2D* PortalTexture;

        UPROPERTY()
        AExedrePlayerController* ControllerOwner;

        int32 PreviousScreenSizeX;
        int32 PreviousScreenSizeY;

        float UpdateDelay;
};
Before diving into the details, here is how the actor is spawned from the Player Controller class, called from the BeginPlay() function :
    FActorSpawnParameters SpawnParams;

    PortalManager = nullptr;
    PortalManager = GetWorld()->SpawnActor<AExedrePortalManager>(   AExedrePortalManager::StaticClass(),
                                                                    FVector::ZeroVector,
                                                                    FRotator::ZeroRotator,
                                                                    SpawnParams);
    PortalManager->AttachToActor( this, FAttachmentTransformRules::SnapToTargetIncludingScale);
    PortalManager->SetControllerOwner( this );
    PortalManager->Init();
So we spawn the actor, attach it to the player controller (this) and then save the reference and call the Init() function.
Is is also important to note that we manually update the actor from the Character class :
void AExedreCharacter::TickActor( float DeltaTime, enum ELevelTick TickType, FActorTickFunction& ThisTickFunction )
{
    Super::TickActor( DeltaTime, TickType, ThisTickFunction );

    if( UGameplayStatics::GetPlayerController(GetWorld(), 0) != nullptr )
    {
        AExedrePlayerController* EPC = Cast<AExedrePlayerController>( UGameplayStatics::GetPlayerController(GetWorld(), 0) );
        EPC->PortalManager->Update( DeltaTime );
    }
}
Here is also the constructor of the Portal Manager and the Owner setter. Notice that Tick is disabled, once again because we will manually update the Portal Manager via the player.
AExedrePortalManager::AExedrePortalManager(const FObjectInitializer& ObjectInitializer)
    : Super(ObjectInitializer)
{
    PrimaryActorTick.bCanEverTick = false;
    PortalTexture = nullptr;
    UpdateDelay = 1.1f;

    PreviousScreenSizeX = 0;
    PreviousScreenSizeY = 0;
}

void AExedrePortalManager::SetControllerOwner( AExedrePlayerController* NewOwner )
{
    ControllerOwner = NewOwner;

    // My PlayerController class has a function to retrieve the associated
    // Character class for convenience. You will need to adapt this code
    // to get your own. You can use UGameplayStatics::GetPlayerCharacter()
    // for example, by casting your class on top of course.
    Character = NewOwner->GetCharacter();
}
The first thing to start with is obviously the Init() function.
This function is mostly about creating the SceneCapture component (aka the capture device mentioned earlier) and setting it up properly. Obviously it starts by creating a new object and registering it as a component to this actor. We then move on to set the specific properties related to the capture.
Some properties worth to mention :
The rest of the properties are mostly related to post-process settings. They are a good way to control the quality and therefor the performance of the capture.
The last part calls the function that creates the Render Target that we will see next.
void AExedrePortalManager::Init()
{
    //------------------------------------------------
    //Create Camera
    //------------------------------------------------
    SceneCapture = NewObject<USceneCaptureComponent2D>(this, USceneCaptureComponent2D::StaticClass(), *FString("PortalSceneCapture"));

    SceneCapture->AttachToComponent( GetRootComponent(), FAttachmentTransformRules::SnapToTargetIncludingScale );
    SceneCapture->RegisterComponent();

    SceneCapture->bCaptureEveryFrame            = false;
    SceneCapture->bCaptureOnMovement            = false;
    SceneCapture->LODDistanceFactor             = 3; //Force bigger LODs for faster computations
    SceneCapture->TextureTarget                 = nullptr;
    SceneCapture->bEnableClipPlane              = true;
    SceneCapture->bUseCustomProjectionMatrix    = true;
    SceneCapture->CaptureSource                 = ESceneCaptureSource::SCS_SceneColorHDRNoAlpha;

    //Setup Post-Process of SceneCapture (optimization : disable Motion Blur, etc)
    FPostProcessSettings CaptureSettings;

    CaptureSettings.bOverride_AmbientOcclusionQuality       = true;
    CaptureSettings.bOverride_MotionBlurAmount              = true;
    CaptureSettings.bOverride_SceneFringeIntensity          = true;
    CaptureSettings.bOverride_GrainIntensity                = true;
    CaptureSettings.bOverride_ScreenSpaceReflectionQuality  = true;

    CaptureSettings.AmbientOcclusionQuality         = 0.0f; //0=lowest quality..100=maximum quality
    CaptureSettings.MotionBlurAmount                = 0.0f; //0 = disabled
    CaptureSettings.SceneFringeIntensity            = 0.0f; //0 = disabled
    CaptureSettings.GrainIntensity                  = 0.0f; //0 = disabled
    CaptureSettings.ScreenSpaceReflectionQuality    = 0.0f; //0 = disabled

    CaptureSettings.bOverride_ScreenPercentage      = true;
    CaptureSettings.ScreenPercentage                = 100.0f;

    SceneCapture->PostProcessSettings = CaptureSettings;

    //------------------------------------------------
    //Create RTT Buffer
    //------------------------------------------------
    GeneratePortalTexture();
}
GeneratePortalTexture() is the function that is called when it is needed to create a new Render Target texture for the portals. It happens during the initialization function but can also be called during the update of the Portal Manager. This is why the function has an internal check to see if the viewport resolution changed. If it did not, it discards the update.
The code below shows how the render target is created at runtime and resized in case it already exists.
void AExedrePortalManager::GeneratePortalTexture()
{
    int32 CurrentSizeX = 1920;
    int32 CurrentSizeY = 1080;

    if( ControllerOwner != nullptr )
    {
        ControllerOwner->GetViewportSize(CurrentSizeX, CurrentSizeY);
    }

    // Use a smaller size than the current
    // screen to reduce the performance impact
    CurrentSizeX = FMath::Clamp( int(CurrentSizeX / 1.7), 128, 1920); //1920 / 1.5 = 1280
    CurrentSizeY = FMath::Clamp( int(CurrentSizeY / 1.7), 128, 1080);

    if( CurrentSizeX == PreviousScreenSizeX
    &&  CurrentSizeY == PreviousScreenSizeY )
    {
        return;
    }

    PreviousScreenSizeX = CurrentSizeX;
    PreviousScreenSizeY = CurrentSizeY;


    // Create the RenderTarget if it does not exist
    if( PortalTexture == nullptr )
    {
        // Create new RTT
        PortalTexture = NewObject<UTextureRenderTarget2D>(
            this,
            UTextureRenderTarget2D::StaticClass(),
            *FString("PortalRenderTarget")
        );
        check( PortalTexture );

        PortalTexture->RenderTargetFormat   = ETextureRenderTargetFormat::RTF_RGBA16f;
        PortalTexture->Filter               = TextureFilter::TF_Bilinear;
        PortalTexture->SizeX                = CurrentSizeX;
        PortalTexture->SizeY                = CurrentSizeY;
        PortalTexture->ClearColor           = FLinearColor::Black;
        PortalTexture->TargetGamma          = 2.2f;
        PortalTexture->bNeedsTwoCopies      = false;
        PortalTexture->AddressX             = TextureAddress::TA_Clamp;
        PortalTexture->AddressY             = TextureAddress::TA_Clamp;

        // Not needed since the texture is displayed on screen directly
        // in some engine versions this can even lead to crashes (notably 4.24/4.25)
        PortalTexture->bAutoGenerateMips    = false;

        // This force the engine to create the render target
        // with the parameters we defined just above
        PortalTexture->UpdateResource();
    }
    // Resize the RenderTarget if it already exists
    else
    {
        PortalTexture-> ResizeTarget( CurrentSizeX, CurrentSizeY );
    }
}
It is important to understand where the capture will be displayed. Since the render target will be showed in-game, it means it will happen before any post-processes which is why we need to render the scene with enough information (aka in HDR) into a 16bits render target (to store values higher than 1, for generating Bloom). This is why I set the format to RGBA16f.
For more information see :
Next are the updates functions. The base one is quite simple and call the more advanced one. There is a delay for calling the GeneratePortalTexture() function to avoid recreating a render target when the viewport is resized (for example in-editor). When publishing you game later this delay could be removed.
void AExedrePortalManager::Update( float DeltaTime )
{
    //-----------------------------------
    // Generate Portal texture ?
    //-----------------------------------
    UpdateDelay += DeltaTime;

    if( UpdateDelay > 1.0f )
    {
        UpdateDelay = 0.0f;
        GeneratePortalTexture();
    }

    //-----------------------------------
    // Find portals in the level and update them
    //-----------------------------------
    AExedrePortal* Portal = UpdatePortalsInWorld();

    if( Portal != nullptr )
    {
        UpdateCapture( Portal );
    }
}
We call UpdatePortalsInWorld() which goal is to find all the Portals present in the current world (including all loaded levels) and to update them. The function also determines which one is "active", aka which one is visible by the player. If we found an active portal, then we call UpdateCapture() which manages the SceneCapture component.
Here is how the world update inside UpdatePortalsInWorld() works :
The check that determines if a Portal is valid is simple : we give priority to the closest Portal to the Player since it will likely be the one the most visible from its point of view. More complex tests would be needed to discard Portals that are close but behind you for example, but I did not want to focus on that for this tutorial as this could become quite complicated.
AExedrePortal* AExedrePortalManager::UpdatePortalsInWorld()
{
    if( ControllerOwner == nullptr )
    {
        return nullptr;
    }

    //-----------------------------------
    // Update Portal actors in the world (and active one if nearby)
    //-----------------------------------
    AExedrePortal* ActivePortal = nullptr;
    FVector PlayerLocation      = Character->GetActorLocation();
    float Distance              = 4096.0f;

    for( TActorIterator<AExedrePortal>ActorItr( GetWorld() ); ActorItr; ++ActorItr )
    {
        AExedrePortal* Portal   = *ActorItr;
        FVector PortalLocation  = Portal->GetActorLocation();
        FVector PortalNormal    = -1 * Portal->GetActorForwardVector();

        // Reset Portal
        Portal->ClearRTT();
        Portal->SetActive( false );

        // Find the closest Portal when the player is Standing in front of
        float NewDistance = FMath::Abs( FVector::Dist( PlayerLocation, PortalLocation ) );

        if( NewDistance < Distance )
        {
            Distance        = NewDistance;
            ActivePortal    = Portal;
        }
    }

    return ActivePortal;
}
Time to look at the UpdateCapture() function.
This is the actual update function that captures the other side of the Portal. The comments should be quite straightforward but here is a quick summary :
As seen when teleporting an actor, converting properly the location and rotation from the Portal to the local space of its Target is key to make the SceneCapture behave naturally and seamlessly.
Refer back to "Teleporting an Actor" for the definition of ConvertLocationToActorSpace().
void AExedrePortalManager::UpdateCapture( AExedrePortal* Portal )
{
    if( ControllerOwner == nullptr )
    {
        return;
    }

    //-----------------------------------
    // Update SceneCapture (discard if there is no active portal)
    //-----------------------------------
    if(SceneCapture     != nullptr
    && PortalTexture    != nullptr
    && Portal   != nullptr
    && Character        != nullptr )
    {

        UCameraComponent* PlayerCamera = Character->GetCameraComponent();
        AActor* Target  = Portal->GetTarget();

        //Place the SceneCapture to the Target
        if( Target != nullptr )
        {
            //-------------------------------
            // Compute new location in the space of the target actor
            // (which may not be aligned to world)
            //-------------------------------
            FVector NewLocation     = UTool::ConvertLocationToActorSpace(   PlayerCamera->GetComponentLocation(),
                                                                            Portal,
                                                                            Target );

            SceneCapture->SetWorldLocation( NewLocation );

            //-------------------------------
            //Compute new Rotation in the space of the
            //Target location
            //-------------------------------
            FTransform CameraTransform  = PlayerCamera->GetComponentTransform();
            FTransform SourceTransform  = Portal->GetActorTransform();
            FTransform TargetTransform  = Target->GetActorTransform();

            FQuat LocalQuat             = SourceTransform.GetRotation().Inverse() * CameraTransform.GetRotation();
            FQuat NewWorldQuat          = TargetTransform.GetRotation() * LocalQuat;

            //Update SceneCapture rotation
            SceneCapture->SetWorldRotation( NewWorldQuat );

            //-------------------------------
            //Clip Plane : to ignore objects between the
            //SceneCapture and the Target of the portal
            //-------------------------------
            SceneCapture->ClipPlaneNormal   = Target->GetActorForwardVector();
            SceneCapture->ClipPlaneBase     = Target->GetActorLocation()
                                            + (SceneCapture->ClipPlaneNormal * -1.5f); //Offset to avoid visible pixel border
        }

        // Switch on the valid Portal
        Portal->SetActive( true );

        // Assign the Render Target
        Portal->SetRTT( PortalTexture );
        SceneCapture->TextureTarget = PortalTexture;

        // Get the Projection Matrix
        SceneCapture->CustomProjectionMatrix = ControllerOwner->GetCameraProjectionMatrix();

        // Say Cheeeeese !
        SceneCapture->CaptureScene();
    }
}
The function GetCameraProjectionMatrix() doesn’t exist by default in the PlayerController class, it is something I added myself. You can see it below :
FMatrix AExedrePlayerController::GetCameraProjectionMatrix()
{
    FMatrix ProjectionMatrix;

    if( GetLocalPlayer() != nullptr )
    {
        FSceneViewProjectionData PlayerProjectionData;

        GetLocalPlayer()->GetProjectionData( GetLocalPlayer()->ViewportClient->Viewport,
                                        EStereoscopicPass::eSSP_FULL,
                                        PlayerProjectionData );

        ProjectionMatrix = PlayerProjectionData.ProjectionMatrix;
    }

    return ProjectionMatrix;
}
Lastly, we have to implement the call the Teleport function. The reason why the teleporting is partially handled via the Portal manager is to be sure we update the right Portals and only the Manager has an overview of all the Portals in the scene.
If you have two portals linked together, when crossing from one to the other you have to update within the same Tick both of them. Otherwise you would teleport and end-up on the other side of the Portal but the Target Portal wouldn’t be active yet until the next frame/tick. This could create some visual discontinuities with the Plane mesh offset material seen earlier.
void AExedrePortalManager::RequestTeleportByPortal( AExedrePortal* Portal, AActor* TargetToTeleport )
{
    if( Portal != nullptr && TargetToTeleport != nullptr )
    {
        Portal->TeleportActor( TargetToTeleport );

        //-----------------------------------
        //Force update
        //-----------------------------------
        AExedrePortal* FuturePortal = UpdatePortalsInWorld();

        if( FuturePortal != nullptr )
        {
            FuturePortal->ForceTick(); //Force update before the player render its view since he just teleported
            UpdateCapture( FuturePortal );
        }
    }
}
That’s it, we are finally done with the Portal Manager ! 😀
Now that the Portal Manager is in place, we just need to finish the Portal actor itself and the system should work. The only parts missing are the Tick functions :
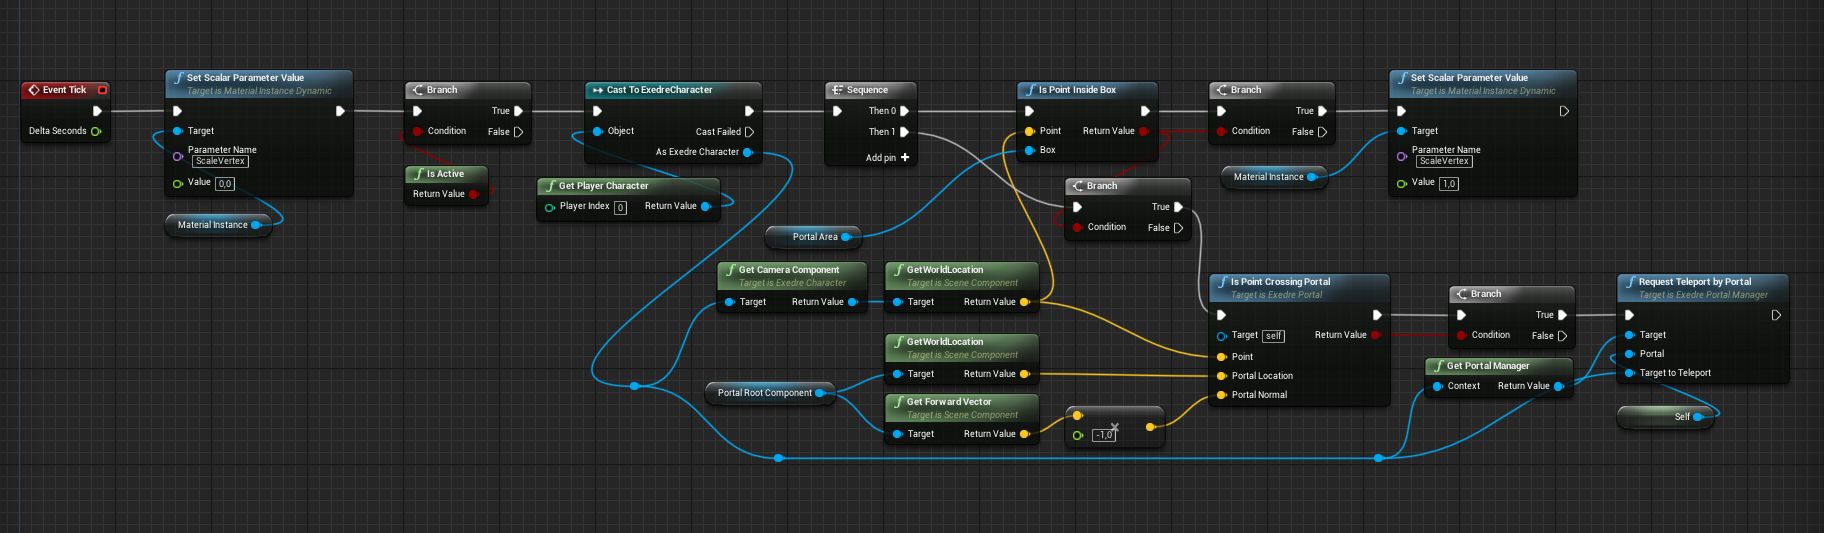
Here are how things work :
Now you may notice two little things in the screenshot of my graph : "Is Point Inside Box" and "Get Portal Manager". They are both a function that I haven’t explained yet. Those are static functions that I have defined in a custom class so that I can call them from anywhere. It’s an utility belt class sort-of. So below is the definition of these functions, you can decide where you want to put them. If you don’t need them outside of the Portal system, you could put them in the Portal actor class directly.
At first I wanted to use the Collision system to determine if the Player was inside the box of the Portal actor, but I did not find it reliable enough. Besides, I think this method is a bit faster to use and has the advantage of taking the rotation of the actor into account.
bool IsPointInsideBox( FVector Point, UBoxComponent* Box )
{
    if( Box != nullptr )
    {
        // From :
        // https://stackoverflow.com/questions/52673935/check-if-3d-point-inside-a-box/52674010

        FVector Center      = Box->GetComponentLocation();
        FVector Half        = Box->GetScaledBoxExtent();
        FVector DirectionX  = Box->GetForwardVector();
        FVector DirectionY  = Box->GetRightVector();
        FVector DirectionZ  = Box->GetUpVector();

        FVector Direction   = Point - Center;

        bool IsInside = FMath::Abs( FVector::DotProduct( Direction, DirectionX ) ) <= Half.X &&
                        FMath::Abs( FVector::DotProduct( Direction, DirectionY ) ) <= Half.Y &&
                        FMath::Abs( FVector::DotProduct( Direction, DirectionZ ) ) <= Half.Z;

        return IsInside;
    }
    else
    {
        return false;
    }
}
AExedrePortalManager* GetPortalManager( AActor* Context )
{
    AExedrePortalManager* Manager = nullptr;

    //Retrieve the World from the Context actor
    if( Context != nullptr && Context->GetWorld() != nullptr )
    {
        //Find PlayerController
        AExedrePlayerController* EPC = Cast<AExedrePlayerController>( Context->GetWorld()->GetFirstPlayerController() );

        //Retrieve the Portal Manager
        if( EPC != nullptr && EPC->GetPortalManager() != nullptr )
        {
            Manager = EPC->GetPortalManager();
        }
    }

    return Manager;
}
Last part of the Blueprint actor is the "ForceTick". Remember that the Force Tick is called when the Player cross the Portal and ends-up next to an other Portal which the Portal Manager force an update to. Because we just teleported, there is no need to run exactly the same code and we can use a simpler version instead :
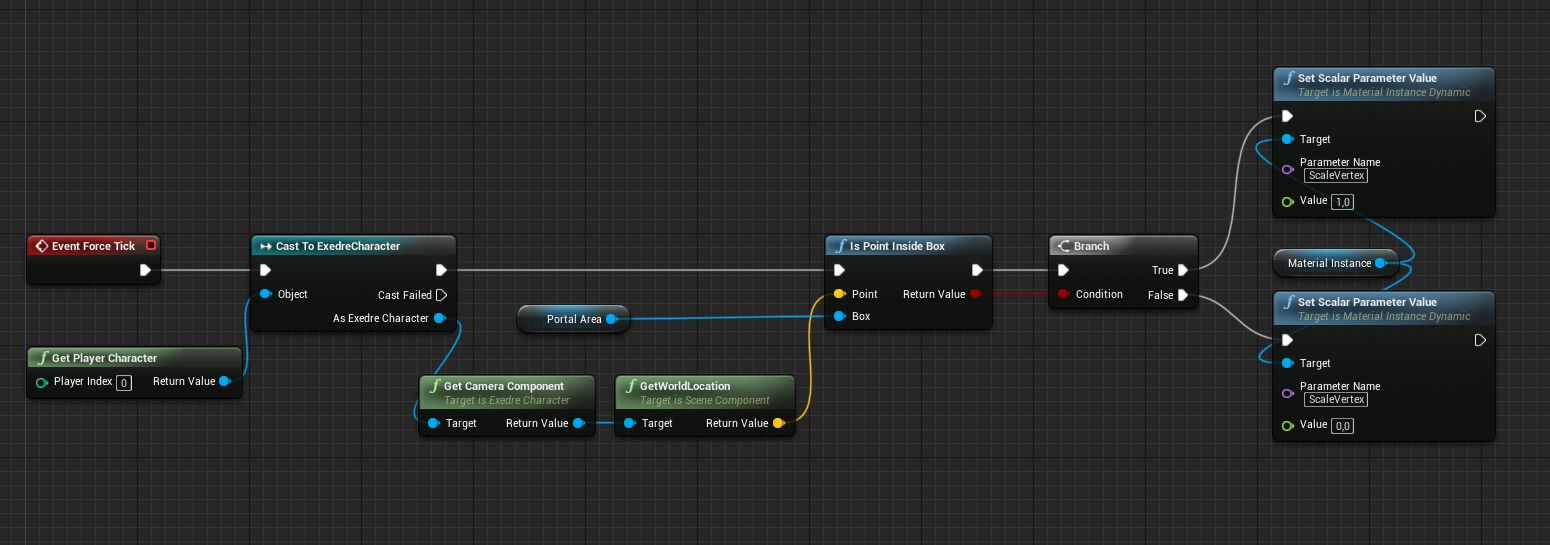
The process roughly starts the same as in the Tick function but we only perform the first part of the sequence that update the Material.
Almost.
If you implement the Portal system as-is, you will likely encounter the following issue :
What’s happening here ?
On this gif the game framerate is locked at 6 FPS to demonstrate more easily the problem. During one frame the cube is missing because the Unreal Engine culling system believe it should be hidden.
This is because the detection is performed during the current frame and then used in the next one. This creates a one-frame delay. Usually this can be solved by expanding the object bounding box so that it can be registered before being actually visible. However it doesn’t work here because we teleport from one place to a completely different one when we cross the Portal.
Disabling the culling system is not a solution, especially since in levels with lots of objects it would reduce performances. Besides, I tried many Unreal Engine commands to disable it and did not find any positive results : the one-frame delay remained in all-cases. Fortunately I found a way after diving into the Unreal Engine source code (took me more than a week, it was a long journey) !
Like with the SceneCapture component, it is possible to tell to the Player camera that we did a "jump cut", that the Camera jumped between two frames and therefor it can’t rely on the previous frame information. This behavior can be observed when using Matinee or Sequencer for example when you switch cameras : your motion blur or anti-aliasing can’t rely on the previous frame information.
Note: In newer version of the engine, Scene Capture Components now have a new boolean setting named "bCameraCutThisFrame" which can be used to perform this jump cut. This means in the steps described below the part with the LocalPlayer can be replaced by this setting instead. See this documentation page.
So in order to do that we have to look into two things :
The big advantage of this solution is that the intervention in the engine rendering process is very minimal and easy to maintain with the future updates of the Unreal Engine. :)
Let’s start by creating a new class, inherited from LocalPlayer. Below is the header where we have the two main components : the override of the Scene Viewport computation and a new function to call in the Camera cut.
#pragma once

#include "CoreMinimal.h"
#include "Engine/LocalPlayer.h"
#include "ExedreLocalPlayer.generated.h"

UCLASS()
class EXEDRE_API UExedreLocalPlayer : public ULocalPlayer
{
    GENERATED_BODY()

    UExedreLocalPlayer();

    public:
        FSceneView* CalcSceneView( class FSceneViewFamily* ViewFamily, FVector& OutViewLocation, FRotator& OutViewRotation, FViewport* Viewport, class FViewElementDrawer* ViewDrawer, EStereoscopicPass StereoPass) override;

        void PerformCameraCut();

    private:
        bool bCameraCut;
};
Here are how things are implemented :
#include "Exedre.h"
#include "ExedreLocalPlayer.h"

UExedreLocalPlayer::UExedreLocalPlayer()
{
    bCameraCut = false;
}

FSceneView* UExedreLocalPlayer::CalcSceneView( class FSceneViewFamily* ViewFamily, FVector& OutViewLocation, FRotator& OutViewRotation, FViewport* Viewport, class FViewElementDrawer* ViewDrawer, EStereoscopicPass StereoPass)
{
    // ULocalPlayer::CalcSceneView() use a ViewInitOptions to create
    // a FSceneView which contains a "bCameraCut" variable
    // See : H:\GitHub\UnrealEngine\Engine\Source\Runtime\Renderer\Private\SceneCaptureRendering.cpp
    // as well for bCameraCutThisFrame in USceneCaptureComponent2D
    FSceneView* View = Super::CalcSceneView(ViewFamily,
                                            OutViewLocation,
                                            OutViewRotation,
                                            Viewport,
                                            ViewDrawer,
                                            StereoPass );
    if( bCameraCut )
    {
        View->bCameraCut = true;
        bCameraCut = false;
    }

    return View;
}

void UExedreLocalPlayer::PerformCameraCut()
{
    bCameraCut = true;
}
PerformCameraCut() just triggers the Camera Cut via a boolean. When the engine calls the CalcSceneView() function we run the original function first. Then we check if we need to perform the cut. If this is the case we override the Camera Cut boolean inside the FSceneView structure that will be used by the engine rendering process and then reset the boolean (we consume it).
On the Player Controller side the change is very minimal. Make sure to add in the header a variable to store a reference to the custom LocalPlayer class :
        UPROPERTY()
        UExedreLocalPlayer* LocalPlayer;
Then in the BeginPlay() function :
LocalPlayer = Cast<UExedreLocalPlayer>( GetLocalPlayer() );
I also added a function to easily trigger the Cut :
void AExedrePlayerController::PerformCameraCut()
{
    if( LocalPlayer != nullptr )
    {
        LocalPlayer->PerformCameraCut();
    }
}
Finally, in the Portal Manager function RequestTeleportByPortal() you can trigger the Camera Cut during the Teleport process :
void AExedrePortalManager::RequestTeleportByPortal( AExedrePortal* Portal, AActor* TargetToTeleport )
{
    if( Portal != nullptr && TargetToTeleport != nullptr )
    {
        if( ControllerOwner != nullptr )
        {
            ControllerOwner->PerformCameraCut();
        }
[...]
And we are done !
The Camera Cut must called before the SceneCapture is updated, that’s why it is at the beginning of the Teleport function.
Now you are thinking with Portals.
If the system works well, you should be able to create things like this :
If you have issues, make sure to check the following :
Here is a top view of crossing a portal :
Here are some common questions I received in regards to this tutorial :
Is this doable in Blueprint instead of C++ ?
Most of the code above is doable in blueprint apart from two specific points :
So you will need to either keep a C++ implementation to access these two functions, or modify the source engine code to make them Blueprint accessible.
Can you use this system in VR ?
Yes for the most part. Some things will have to be adapted however, such as :
The main issue will be performances as you are rendering twice the other side of the Portal.
Can other objects cross a Portal ?
With the current code, no. However is should not be too hard to make it more generic. This will require the Portal to track more information regarding all the object that are nearby to see if the are crossing or not.
Do you support recursion (portal withing a portal) ?
In this tutorial, no. Recursion would require additional render targets and SceneCaptures. It would be necessary as well to determine which RenderTarget should be rendered first, etc. This is a bit complicated and I did not want to handle that because I have not the need for it.
Can you cross a Portal against a wall ?
Unfortunately no.
However I see two ways to achieve that (theoretically) :